

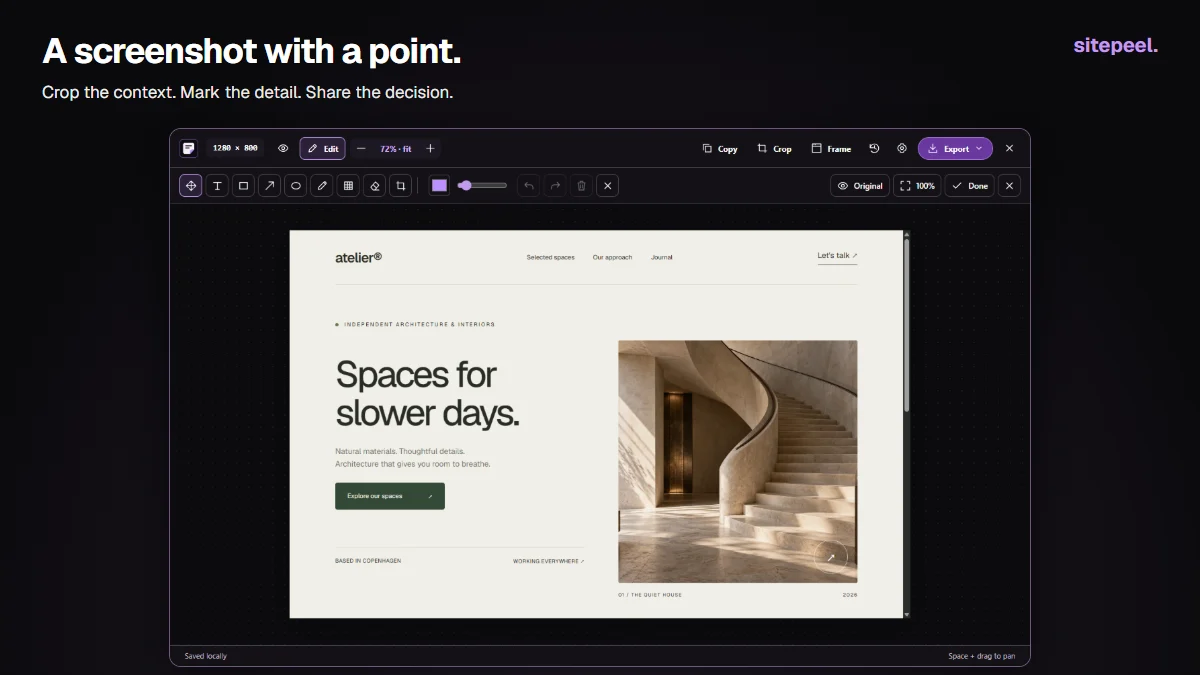
Version and availability
This guide covers Sitepeel 1.0.3. Preview 1.0.3 here. Browser-store availability may vary while the update rolls out. The website demo lets you try the updated tools on public Sitepeel pages without an account.
Start with the smallest useful capture
Use Visible area for a composition at a known browser width. Choose Full page for the overall page rhythm, Snip & capture for a hand-picked rectangle, and Pick an element for a component. Capturing a full page for one button makes the reviewer work harder to find the issue.
For long pages, leave Scroll before capture enabled so Sitepeel can load lazy images and reveal scroll-triggered sections before capturing. Enable Long page capture only when you need more than the default ten screens. Watch the progress message and stay on the tab. Capture limits still apply.
Adjust the crop before adding annotations
Captures open in the editor by default. Choose Crop and adjust the edges or corners until the relevant content has enough breathing room. Keep context such as the page heading when it helps explain where the problem happens. Apply the crop, or cancel it to keep the original view.
Zoom the editor to fit your screen while working. Review at 100% before exporting to judge sharpness. Increasing export scale makes a larger image, but it cannot restore detail that the original capture did not contain. For text-heavy references, start with a sufficiently large original capture.
Use Edit for a small number of clear marks
Click Edit to reveal annotation tools. An arrow points to a location, a rectangle groups a region and a text note explains the intended change. Use one color consistently and avoid covering the content you want reviewed. Undo and redo help compare a clean version with your annotations.
The eraser removes annotation marks; it does not erase the underlying website from the screenshot. Use crop to remove an outer area. Blur can visually obscure a detail, but do not rely on blur alone to protect secrets or personal information. Remove sensitive content before capture and inspect the final export.
Page: /signup
Viewport: 390 × 844 CSS px
Issue: The validation message overlaps the next field.
Expected: The message wraps and the next field moves down.
Attachment: signup-validation-390px.png
Choose a frame and background for the purpose
For a bug report, the screenshot and one annotation may be enough. For a presentation, open the frame controls and choose a browser frame, then select a wallpaper, gradient or solid color. Adjust padding so the page has a clear boundary without becoming too small to read.
The wallpaper picker starts with a compact selection and offers more backgrounds when you need them. Keep the background quiet around dense text. A decorative frame can help a presentation; leave it off when the reviewer needs to inspect exact page edges.
Export the right file and keep a useful original
Open Export to choose PNG, JPG, WebP or PDF and give the file a descriptive name. PNG is a useful choice for sharp interface text. JPG and WebP provide adjustable compression. PDF places the capture on A4 pages, so check page breaks when exporting a long screenshot.
Use Copy for a quick handoff when the browser grants clipboard access. If copying is unavailable, export a file. Capture history lets you reopen recent images, subject to the retention setting and available browser storage. Download work you need to keep.
If you always want a file immediately, open Dashboard → Capture and change the destination to direct download. The editor remains available for captures you choose to keep in history. Settings in this website demo are separate from your installed extension.